All Stories
Showing posts with label HTC. Show all posts

Thursday, 3 April 2014

How To Flash ClockWorkMod Recovery On HTC One M8

How To Flash ClockWorkMod Recovery On HTC One M8

HTC One M8 or the All New HTC One is the successor of previous HTC One M7 smartphone which was a great droid. Now the HTC One M8 is improved and upgraded as compared to the previous M7 version. It is powered by 5" Display with 441 ppi, 2 GB RAM, 16/32 GB Internal Storage, 2.3 Ghz Quad Core CPU, Dual 4 Megapixel Camera and Android 4.4.2 KitKat. 

The Dual 4 Megapixel camera is placed next to each other which features to take best photos in some sort of focus. Most people will get confused because of its same design and same name, The previous was also called HTC One and this one is also called HTC One and the difference is M7 and M8 which most of people don't know. Now we are flashing/installing a custom Recovery called "ClockWorkMod" (CWM) Recovery which is the most essential and featured recovery ever made. This recovery enables the users to Flash ZIP Package files which include themes, apps, system mods, ROMs etc. Also wipe cache/data/factory reset/dalvik cache etc and also write various types of permissions. Now get ready to Flash/Install ClockWorkMod (CWM) Recovery On HTC One M8.


Before You Begin: (must do)
1. Drivers must be installed on your PC for HTC Devices, to support it in Fastboot mode. Go to:  HTC USB Drivers.
2. Unlock the bootloader of your device first, please go to: http://www.htcdev.com/bootloader


Downloads:
1. Fastboot.
2. philz_touch_6.25.5-m8-fix2.img


Arranging Files:
1. First download the above both files, the fastboot and the recovery img file.
2. Extract the Fastboot zip file.
3. Move the philz_touch_6.25.5m8-fix2.img file to the extracted Fastboot folder.
4. Make sure the recovery img is in the Fastboot folder.


Installation:
1. Restart your phone in HBoot menu by hold and pressing Volume Down + Power Button at the same time until the phone reboots in a white HBoot Menu.
2. Now in the HBoot Menu click on Fastboot.
3. Now connect your phone to PC via USB Cable.
4. Hold Shift in Keyboard and Right click on Fastboot folder, then click "Open Command Window Here"
5. You will see a command line window opened up, so type the following code and hit enter:
fastboot flash recovery philz_touch_6.25.5-m8-fix2.img
7. The recovery image will be flashed and Reboot your device.
8. To go into recovery mode Go to HBoot menu and click on Recovery.


Having Problems
1. After entering the code if your reply was "waiting for device" so there may be following two issues:
a. The drivers must be missing or not properly installed, You can search for HTC USB Drivers on the web and install it again.
b. If the drivers are properly install so you have entered the wrong name of recovery, just rename the recovery image file with recovery.img and then enter this code:
fastboot flash recovery recovery.img 
So you will have the no problem in giving long name. If you have still problems, leave comments and let me know the problem.

Don't forget to share this article!

How To Flash ClockWorkMod Recovery On HTC One M8

How To Flash ClockWorkMod Recovery On HTC One M8

How To Flash ClockWorkMod Recovery On HTC One M8

HTC One M8 or the All New HTC One is the successor of previous HTC One M7 smartphone which was a great droid. Now the HTC One M8 is improved and upgraded as compared to the previous M7 version. It is powered by 5" Display with 441 ppi, 2 GB RAM, 16/32 GB Internal Storage, 2.3 Ghz Quad Core CPU, Dual 4 Megapixel Camera and Android 4.4.2 KitKat. 

The Dual 4 Megapixel camera is placed next to each other which features to take best photos in some sort of focus. Most people will get confused because of its same design and same name, The previous was also called HTC One and this one is also called HTC One and the difference is M7 and M8 which most of people don't know. Now we are flashing/installing a custom Recovery called "ClockWorkMod" (CWM) Recovery which is the most essential and featured recovery ever made. This recovery enables the users to Flash ZIP Package files which include themes, apps, system mods, ROMs etc. Also wipe cache/data/factory reset/dalvik cache etc and also write various types of permissions. Now get ready to Flash/Install ClockWorkMod (CWM) Recovery On HTC One M8.


Before You Begin: (must do)
1. Drivers must be installed on your PC for HTC Devices, to support it in Fastboot mode. Go to:  HTC USB Drivers.
2. Unlock the bootloader of your device first, please go to: http://www.htcdev.com/bootloader


Downloads:
1. Fastboot.
2. philz_touch_6.25.5-m8-fix2.img


Arranging Files:
1. First download the above both files, the fastboot and the recovery img file.
2. Extract the Fastboot zip file.
3. Move the philz_touch_6.25.5m8-fix2.img file to the extracted Fastboot folder.
4. Make sure the recovery img is in the Fastboot folder.


Installation:
1. Restart your phone in HBoot menu by hold and pressing Volume Down + Power Button at the same time until the phone reboots in a white HBoot Menu.
2. Now in the HBoot Menu click on Fastboot.
3. Now connect your phone to PC via USB Cable.
4. Hold Shift in Keyboard and Right click on Fastboot folder, then click "Open Command Window Here"
5. You will see a command line window opened up, so type the following code and hit enter:
fastboot flash recovery philz_touch_6.25.5-m8-fix2.img
7. The recovery image will be flashed and Reboot your device.
8. To go into recovery mode Go to HBoot menu and click on Recovery.


Having Problems
1. After entering the code if your reply was "waiting for device" so there may be following two issues:
a. The drivers must be missing or not properly installed, You can search for HTC USB Drivers on the web and install it again.
b. If the drivers are properly install so you have entered the wrong name of recovery, just rename the recovery image file with recovery.img and then enter this code:
fastboot flash recovery recovery.img 
So you will have the no problem in giving long name. If you have still problems, leave comments and let me know the problem.

Don't forget to share this article!

Posted at 08:47 |  by John Peter

Saturday, 29 March 2014

How To Flash ClockWorkMod Recovery On HTC Desire 816

HTC Desire 816 is a mid range phablet from HTC. It have a pretty design along with great hardware. It have 5.5" Display, 1.5 GB RAM, 8 GB Internal storage, 13 Megapixel Camera shooter, 1.6 Ghz Quad Core CPU and with Android. Now this device comes with default HTC Sense UI 5.5 and Android which is pretty good but some people don't like its UI and want any other type of theme or ROM for their device. Now to enable this feature we are now Flashing a custom made Recovery called ClockWorkMod recovery which is most important and necessary in modification of a device. This recovery enable users to Flash .zip package files which include system apps, tweaks, ROMs, themes etc. It also writes some other types of permissions and other developer related work. Get ready to Flash ClockWorkMod Recovery On HTC Desire 816. 


Before You Begin: (must do)
1. Drivers must be installed on your PC, if not go to : HTC USB Drivers.
2. You should have unlock your device bootloader at here  :  http://www.htcdev.com/bootloader   select your device as HTC One

Downloads:
1. recovery_en.img
2. Fastboot

Installation:
1. Now download the above recovery_en.img file and fastboot.zip
2. Reboot your HTC Desire 816 in HBOOT Menu by pressing Volume Down + Power Button at the same time for some time, don't leave the buttons until you see a white screen menu as shown below:
3. When you see the above menu so leave the all buttons and click On Fastboot.
4. Now extract the fastboot file and move the recovery_en.img file to the extracted Fastboot folder. 
5. Then connect your device to PC via USB.
6. Now hold keyboard Shift and Right click on Fastboot folder, then click Open Command Window Here. You will see a command prompt window
7. In the window type the following code:
fastboot flash recovery recovery_en.img
8. You will see a short time message which is a success message that shows your recovery is flashed successfully. OR if the reply was "waiting for device" so the device is not connected properly or drivers are missing, so try to install the drivers correctly and connect the device agian. 
9. To go into Recovery mode, Restart your phone in HBOOT menu and click Recovery.

How To Flash ClockWorkMod Recovery On HTC Desire 816

How To Flash ClockWorkMod Recovery On HTC Desire 816

HTC Desire 816 is a mid range phablet from HTC. It have a pretty design along with great hardware. It have 5.5" Display, 1.5 GB RAM, 8 GB Internal storage, 13 Megapixel Camera shooter, 1.6 Ghz Quad Core CPU and with Android. Now this device comes with default HTC Sense UI 5.5 and Android which is pretty good but some people don't like its UI and want any other type of theme or ROM for their device. Now to enable this feature we are now Flashing a custom made Recovery called ClockWorkMod recovery which is most important and necessary in modification of a device. This recovery enable users to Flash .zip package files which include system apps, tweaks, ROMs, themes etc. It also writes some other types of permissions and other developer related work. Get ready to Flash ClockWorkMod Recovery On HTC Desire 816. 


Before You Begin: (must do)
1. Drivers must be installed on your PC, if not go to : HTC USB Drivers.
2. You should have unlock your device bootloader at here  :  http://www.htcdev.com/bootloader   select your device as HTC One

Downloads:
1. recovery_en.img
2. Fastboot

Installation:
1. Now download the above recovery_en.img file and fastboot.zip
2. Reboot your HTC Desire 816 in HBOOT Menu by pressing Volume Down + Power Button at the same time for some time, don't leave the buttons until you see a white screen menu as shown below:
3. When you see the above menu so leave the all buttons and click On Fastboot.
4. Now extract the fastboot file and move the recovery_en.img file to the extracted Fastboot folder. 
5. Then connect your device to PC via USB.
6. Now hold keyboard Shift and Right click on Fastboot folder, then click Open Command Window Here. You will see a command prompt window
7. In the window type the following code:
fastboot flash recovery recovery_en.img
8. You will see a short time message which is a success message that shows your recovery is flashed successfully. OR if the reply was "waiting for device" so the device is not connected properly or drivers are missing, so try to install the drivers correctly and connect the device agian. 
9. To go into Recovery mode, Restart your phone in HBOOT menu and click Recovery.

Posted at 23:12 |  by John Peter

Thursday, 6 February 2014


How To Improve Picture And Video Recording Quality In HTC First

HTC First has a pretty good 5 Megapixel camera and it can take good pictures but some people dont like and want their device to take some better images and record videos, this is a customization through which we can improve the image and video recording quality of the camera on HTC First. Here are some steps to follow just Follow the steps and get your camera improved.

Before You Begin: (must do)
1. How to Root and Flash CWM Recovery On HTC First

Downloads:
1. Camera.zip

Installation:
1. Move the above zip file to the internal storage of HTC First.
2. Reboot your phone into recovery mode.
3. In Recovery mode, click Install zip from sdcard > Choose zip from sdcard and find that camera zip file where you puted it before, click that file and click YES, to install it.
4. After installation Wipe cache then wipe dalvik cache from recovery mode.
5. After all then Reboot your system. 

How To Improve Picture And Video Recording Quality In HTC First


How To Improve Picture And Video Recording Quality In HTC First

HTC First has a pretty good 5 Megapixel camera and it can take good pictures but some people dont like and want their device to take some better images and record videos, this is a customization through which we can improve the image and video recording quality of the camera on HTC First. Here are some steps to follow just Follow the steps and get your camera improved.

Before You Begin: (must do)
1. How to Root and Flash CWM Recovery On HTC First

Downloads:
1. Camera.zip

Installation:
1. Move the above zip file to the internal storage of HTC First.
2. Reboot your phone into recovery mode.
3. In Recovery mode, click Install zip from sdcard > Choose zip from sdcard and find that camera zip file where you puted it before, click that file and click YES, to install it.
4. After installation Wipe cache then wipe dalvik cache from recovery mode.
5. After all then Reboot your system. 

Posted at 08:04 |  by John Peter

Wednesday, 5 February 2014


How To Root And Flash CWM Recovery On HTC One Mini

HTC One Mini is the smaller version of HTC One, it have a 4.3" 720p Display, 1 GB RAM, 16 GB Internal Storage, 4 Megapixel Camera, 1.4 Ghz Dual Core CPU and 4.2 Jellybean. This is pretty much better for a Mini version of a flagship. Now we are Rooting this device as well as Flashing a custom Recovery to have full access on the OS and can flash Any thing what we want. Get ready to Root and Flash CWM Recovery On HTC one Mini

Before You Begin: (must do)
1. Drivers must be installed on your PC, if not go to : HTC USB Drivers.
2. Unlock the bootloader of your device at here : http://www.htcdev.com/bootloader/

Downloads:
1. Fastboot.zip
2. Recovery.img
3. Superuser.zip

Flashing CWM Recovery:
1. Download the above files.
2. Extract the fastboot and then move the recovery.img file to the fastboot folder.
3. Now Turn off your device and turn it on in HBoot Menu, by pressing Volume Down and Power Button, wait until the phone starts in a white HBoot menu. (for navigation use volume up/down and for click use power button).
4. Now click on Fastboot in the HBoot menu of your device.
5. Connect your device to PC via USB Cable.
6. Hold Shift and Right click on the Fastboot folder in PC, click on Open Command Window Here, in the command window type the following code and hit enter:

fastboot flash recovery recovery.img

7. Recovery will be flashed and Restart your phone.
To go into Recovery Mode, click Recovery in the HBoot Menu.


Rooting The One Mini:
1. Now Move the superuser.zip file to the internal storage of your HTC One Mini
2. Reboot your phone into recovery mode. By going into HBoot Menu, then click Recovery.
3. In Recovery Mode, tap Install zip from sdcard > Choose zip from sdcard and find the superuser.zip file where you puted it before, now click that file and then click YES. 
4. Your phone will be rooted. Just Reboot Your System.

How To Root And Flash CWM Recovery On HTC One Mini


How To Root And Flash CWM Recovery On HTC One Mini

HTC One Mini is the smaller version of HTC One, it have a 4.3" 720p Display, 1 GB RAM, 16 GB Internal Storage, 4 Megapixel Camera, 1.4 Ghz Dual Core CPU and 4.2 Jellybean. This is pretty much better for a Mini version of a flagship. Now we are Rooting this device as well as Flashing a custom Recovery to have full access on the OS and can flash Any thing what we want. Get ready to Root and Flash CWM Recovery On HTC one Mini

Before You Begin: (must do)
1. Drivers must be installed on your PC, if not go to : HTC USB Drivers.
2. Unlock the bootloader of your device at here : http://www.htcdev.com/bootloader/

Downloads:
1. Fastboot.zip
2. Recovery.img
3. Superuser.zip

Flashing CWM Recovery:
1. Download the above files.
2. Extract the fastboot and then move the recovery.img file to the fastboot folder.
3. Now Turn off your device and turn it on in HBoot Menu, by pressing Volume Down and Power Button, wait until the phone starts in a white HBoot menu. (for navigation use volume up/down and for click use power button).
4. Now click on Fastboot in the HBoot menu of your device.
5. Connect your device to PC via USB Cable.
6. Hold Shift and Right click on the Fastboot folder in PC, click on Open Command Window Here, in the command window type the following code and hit enter:

fastboot flash recovery recovery.img

7. Recovery will be flashed and Restart your phone.
To go into Recovery Mode, click Recovery in the HBoot Menu.


Rooting The One Mini:
1. Now Move the superuser.zip file to the internal storage of your HTC One Mini
2. Reboot your phone into recovery mode. By going into HBoot Menu, then click Recovery.
3. In Recovery Mode, tap Install zip from sdcard > Choose zip from sdcard and find the superuser.zip file where you puted it before, now click that file and then click YES. 
4. Your phone will be rooted. Just Reboot Your System.

Posted at 23:13 |  by John Peter

How To Flash CWM Recovery On HTC Butterfly S

HTC Butterfly is a great device as in the era of smartphones tech. It have a 5" 1080p Display, 2 GB RAM, 16 GB Internal storage, 1.9 Ghz Quad Core CPU, 4.2 Jellybean and 4 UltraPixel camera. Before rooting this device we have to Flash A Custom Recovery in order to Flash Custom ROMs and also we will be able to root this device. Now get ready to Flash CWM Recovery On HTC Butterfly S.

Before You Begin: (must do)
1. You should unlock the bootloader of your device. go to: http://www.htcdev.com/bootloader/
2. Drivers should be installed on your PC, go to: HTC USB Drivers

Downloads:
1. Fastboot
2. recovery.img

Flashing CWM Recovery:
1. Download the above both files.
2. Extract the fastboot zip file and move the recovery.img file to the fastboot folder. 
3. Now reboot your phone into HBoot mode by pressing and hold Volume Down + Power Button, wait until a white menu appears, (for navigation use Volume Up/Down and click use power button) Now click on Fastboot in the HBoot Menu.
4. Now connect your phone to PC via USB cable in fastboot mode.
5. Now hold shift and Right click on Fastboot folder, then click Open Command Window Here. In command window type the following command line:

fastboot erase cache

then hit enter and then type the following code:

fastboot flash recovery recovery.img

6. Now reboot your phone, and Recovery was flashed.

To go into recovery mode, First go to HBoot menu then click Recovery.


How To Flash CWM Recovery On HTC Butterfly S


How To Flash CWM Recovery On HTC Butterfly S

HTC Butterfly is a great device as in the era of smartphones tech. It have a 5" 1080p Display, 2 GB RAM, 16 GB Internal storage, 1.9 Ghz Quad Core CPU, 4.2 Jellybean and 4 UltraPixel camera. Before rooting this device we have to Flash A Custom Recovery in order to Flash Custom ROMs and also we will be able to root this device. Now get ready to Flash CWM Recovery On HTC Butterfly S.

Before You Begin: (must do)
1. You should unlock the bootloader of your device. go to: http://www.htcdev.com/bootloader/
2. Drivers should be installed on your PC, go to: HTC USB Drivers

Downloads:
1. Fastboot
2. recovery.img

Flashing CWM Recovery:
1. Download the above both files.
2. Extract the fastboot zip file and move the recovery.img file to the fastboot folder. 
3. Now reboot your phone into HBoot mode by pressing and hold Volume Down + Power Button, wait until a white menu appears, (for navigation use Volume Up/Down and click use power button) Now click on Fastboot in the HBoot Menu.
4. Now connect your phone to PC via USB cable in fastboot mode.
5. Now hold shift and Right click on Fastboot folder, then click Open Command Window Here. In command window type the following command line:

fastboot erase cache

then hit enter and then type the following code:

fastboot flash recovery recovery.img

6. Now reboot your phone, and Recovery was flashed.

To go into recovery mode, First go to HBoot menu then click Recovery.


Posted at 00:26 |  by John Peter

Sunday, 2 February 2014


How To Root And Flash CWM Recovery On HTC First

HTC First is a mid range smartphone from HTC with Facebook Home integrated, is have 720p 4.3" Display, 1.4 Ghz Dual Core CPU, 1 GB RAM, 16 GB Internal Storage, 5 MegaPixel Camera and Android Jellybean. So If we want to root this device and get root permissions to customize it so before that first we should have to Flash a custom Recovery. Get ready to Root And Flash CWM Recovery On HTC First.

Before You Begin: (must do)
1. You should have to unlock the bootloader first. go to: http://www.htcdev.com/bootloader/
2. Drivers must be properly installed on your PC if not go to: HTC USB Drivers

Downloads:
1. Recovery.img
2. Fastboot.zip
3. SueperSU.zip

Flashing CWM Recovery:
1. Download all of the above files.
2. Extract the Fastboot.zip folder. Move the recovery.......img file to the fastboot folder.
3. Turn Off your device, Turn it on in HBoot mode by pressing Volume Down + Power Button, for some time, your phone will start in HBoot mode, (for navigation press Volume UP/Down, for clicking press Power Button). Now in HBoot Mode click on Fastboot.
4. Connect your phone to PC via USB Cable.
5. Hold Shift and Right Click on the Fastboot folder and click Open Command Window Here.
6. In Command window type the following code: 

fastboot erase cache

Then type the following code:

fastboot flash recovery recovery-clockwork-6.0.3.4-mystul.img

7. Recovery will be Flashed. Then Reboot your system.

Rooting HTC First:
1. Now move the SuperSU.zip file to your internal storage of your HTC First
2. Reboot your phone into HBoot by pressing Volume Down + Power Button.
3. In HBoot Menu click on Recovery, You phone will start in Recovery Mode.
4. In Recovery Mode click Install zip from sdcard > Choose zip from sdcard then find the SuperSU.zip file where you puted it before, click that then click Yes, and Your phone will be rooted
5. Just Restart your Phone.


How To Root And Flash CWM Recovery On HTC First


How To Root And Flash CWM Recovery On HTC First

HTC First is a mid range smartphone from HTC with Facebook Home integrated, is have 720p 4.3" Display, 1.4 Ghz Dual Core CPU, 1 GB RAM, 16 GB Internal Storage, 5 MegaPixel Camera and Android Jellybean. So If we want to root this device and get root permissions to customize it so before that first we should have to Flash a custom Recovery. Get ready to Root And Flash CWM Recovery On HTC First.

Before You Begin: (must do)
1. You should have to unlock the bootloader first. go to: http://www.htcdev.com/bootloader/
2. Drivers must be properly installed on your PC if not go to: HTC USB Drivers

Downloads:
1. Recovery.img
2. Fastboot.zip
3. SueperSU.zip

Flashing CWM Recovery:
1. Download all of the above files.
2. Extract the Fastboot.zip folder. Move the recovery.......img file to the fastboot folder.
3. Turn Off your device, Turn it on in HBoot mode by pressing Volume Down + Power Button, for some time, your phone will start in HBoot mode, (for navigation press Volume UP/Down, for clicking press Power Button). Now in HBoot Mode click on Fastboot.
4. Connect your phone to PC via USB Cable.
5. Hold Shift and Right Click on the Fastboot folder and click Open Command Window Here.
6. In Command window type the following code: 

fastboot erase cache

Then type the following code:

fastboot flash recovery recovery-clockwork-6.0.3.4-mystul.img

7. Recovery will be Flashed. Then Reboot your system.

Rooting HTC First:
1. Now move the SuperSU.zip file to your internal storage of your HTC First
2. Reboot your phone into HBoot by pressing Volume Down + Power Button.
3. In HBoot Menu click on Recovery, You phone will start in Recovery Mode.
4. In Recovery Mode click Install zip from sdcard > Choose zip from sdcard then find the SuperSU.zip file where you puted it before, click that then click Yes, and Your phone will be rooted
5. Just Restart your Phone.


Posted at 04:40 |  by John Peter

Tuesday, 21 January 2014


How To Root & Flash CWM Recovery HTC Desire 600 Dual SIM

HTC Desire 600 Dual SIM is a mid range smartphone from HTC, it have 4.5" Display, 1  GB RAM, 8 GB Internal Storage, 8 Megapixel Camera, 1.2 Ghz Quadcore CPU and 4.1 Jellybean. Infact the Desire series is low range and all are dumb but this time HTC did good, We are now rooting this smartphone to get the full control on OS and also do some software tweaks, and also we will Flash a Custom Recovery on this device to flash Custom ROMs, Get ready to Root  and Flash CWM Recovery On HTC Desire 600 Dual SIM

Before You Begin: (must do)
1. You should unlock the bootloader of your device, go to: HTCDEV to unlock your device bootloader.
2. Drivers must be installed on your PC, if not so go to: HTC USB Drivers

Downloads:
1. CWM Recovery
2. SuperSU
2. Fastboot


Flashing And Rooting:
1.   Make sure you have unlocked the bootloader of your device.
2.   Download all the above files.
3.   Extract only the Fastboot zip file.
4.   Now turn off your device, Turn it on by pressing Volume Down + Power Button, at the same time for some time, until the Phone starts in a white screen, then leave all buttons. (navigate using Volume Up/Down, for click use Power button)
5.   Now click Fastboot in that menu.
6.   Connect your device to PC via USB Cable. Move the recovery.img file to the Fastboot folder in your Computer.
7.   Now hold Shift and Right click on Fastboot folder, then click Open Command Window Here,
8.   Type the below code in command prompt:

      fastboot flash recovery recovery.img

9.   Recovery will be flashed, Then reboot your device.
10. Now move the SuperSU zip file to the internal storage of device.
11. Now again turn off your device. Turn it on by pressing Volume Down + Power Button at the same time for some time, dont leave the buttons until a white menu screen appears, then leave all buttons and then click on Recovery. Your device will be booted in recovery mode.
12. In Recovery menu, select Install zip from sdcard > Choose zip from sdcard and find that SuperSU zip file where you puted it before. tap that file and tap Yes, 
13. Your device will be rooted, then go back and reboot your system.

Congratulations! your device is rooted and flashed with custom recovery.

How To Root And Flash CWM Recovery On HTC Desire 600 Dual SIM


How To Root & Flash CWM Recovery HTC Desire 600 Dual SIM

HTC Desire 600 Dual SIM is a mid range smartphone from HTC, it have 4.5" Display, 1  GB RAM, 8 GB Internal Storage, 8 Megapixel Camera, 1.2 Ghz Quadcore CPU and 4.1 Jellybean. Infact the Desire series is low range and all are dumb but this time HTC did good, We are now rooting this smartphone to get the full control on OS and also do some software tweaks, and also we will Flash a Custom Recovery on this device to flash Custom ROMs, Get ready to Root  and Flash CWM Recovery On HTC Desire 600 Dual SIM

Before You Begin: (must do)
1. You should unlock the bootloader of your device, go to: HTCDEV to unlock your device bootloader.
2. Drivers must be installed on your PC, if not so go to: HTC USB Drivers

Downloads:
1. CWM Recovery
2. SuperSU
2. Fastboot


Flashing And Rooting:
1.   Make sure you have unlocked the bootloader of your device.
2.   Download all the above files.
3.   Extract only the Fastboot zip file.
4.   Now turn off your device, Turn it on by pressing Volume Down + Power Button, at the same time for some time, until the Phone starts in a white screen, then leave all buttons. (navigate using Volume Up/Down, for click use Power button)
5.   Now click Fastboot in that menu.
6.   Connect your device to PC via USB Cable. Move the recovery.img file to the Fastboot folder in your Computer.
7.   Now hold Shift and Right click on Fastboot folder, then click Open Command Window Here,
8.   Type the below code in command prompt:

      fastboot flash recovery recovery.img

9.   Recovery will be flashed, Then reboot your device.
10. Now move the SuperSU zip file to the internal storage of device.
11. Now again turn off your device. Turn it on by pressing Volume Down + Power Button at the same time for some time, dont leave the buttons until a white menu screen appears, then leave all buttons and then click on Recovery. Your device will be booted in recovery mode.
12. In Recovery menu, select Install zip from sdcard > Choose zip from sdcard and find that SuperSU zip file where you puted it before. tap that file and tap Yes, 
13. Your device will be rooted, then go back and reboot your system.

Congratulations! your device is rooted and flashed with custom recovery.

Posted at 23:27 |  by John Peter

Thursday, 16 January 2014


How To Root HTC Desire 400 Dual SIM

HTC Desire series is the series of low range smartphones from HTC, this is the Desire 400 Dual SIM version with fair specs such as 1 GB RAM, 1 Ghz Dual Core CPU, 5 Mega Pixel shooter, Jellybean and a 4.3" screen. Now we have to root this device to make it do more functions and do more, Get ready to root HTC Desire 400 Dual SIM.

Before You Begin: 
1. You should know about rooting a device.

Downloads:
1. Framaroot.apk

Rooting Desire 400:
1. Download the above apk file.
2. Move the apk file to your HTC Desire 400 internal storage.
3. Install the apk file.
4. Open Framaroot app from Menu.
5. Choose SuperSU from the Menu in Framaroot app and tap any of the below exploits. (If one not work try another)
6. After choosing exploit, a success message will be given and your device will be rooted.
7. You can check SuperSU app in the Menu.

How To Root HTC Desire 400 Dual SIM


How To Root HTC Desire 400 Dual SIM

HTC Desire series is the series of low range smartphones from HTC, this is the Desire 400 Dual SIM version with fair specs such as 1 GB RAM, 1 Ghz Dual Core CPU, 5 Mega Pixel shooter, Jellybean and a 4.3" screen. Now we have to root this device to make it do more functions and do more, Get ready to root HTC Desire 400 Dual SIM.

Before You Begin: 
1. You should know about rooting a device.

Downloads:
1. Framaroot.apk

Rooting Desire 400:
1. Download the above apk file.
2. Move the apk file to your HTC Desire 400 internal storage.
3. Install the apk file.
4. Open Framaroot app from Menu.
5. Choose SuperSU from the Menu in Framaroot app and tap any of the below exploits. (If one not work try another)
6. After choosing exploit, a success message will be given and your device will be rooted.
7. You can check SuperSU app in the Menu.

Posted at 04:22 |  by John Peter

Monday, 2 December 2013


As the HTC One was a great flagship from HTC this time we have the phablet version of that, it is the HTC One Max, it have a great screen, great memory, Camera etc but now it is upgraded with finger print system. It have a black sensor ported behind the phone below the camera, now we will flash a custom recovery on this great phablet as well as get root access to this device.

Before You Begin:
1. You should have to unlock bootloader of the device. Visit here
2. You should have to set up drivers and ADB for this device.


Downloads:
1. HTC USB Drivers
2. ADB files.
3. CWM Recovery.img
4. SuperSU.zip

Installing CWM Recovery
1. Install the usb drivers. 
2. Extract the adb & fastboot zip file.
3. Move the cwm recovery img file to the fastboot folder.
4. After unlocking the bootloader of the device reboot your phone in fastboot mode.
5. Connect it to the PC via USB cable.
6. Hold Shift and Right Click on Fastboot folder and click Open Command Prompt Here.
7. Type the following code.
fastboot flash recovery recovery-clockwork-touch-6.0.4.5-t6xx.img
8. After entering the code press enter and you will see a message that it will show time of flashing. if Not then properly install the drivers.

Rooting The Device
1. After flashing the CWM recovery.
2. Download the SuperSU.zip file and donot extract it, just move it to the internal storage of device.
3. Reboot your phone into fastboot mode and press recovery.
4. In Recovery, Install zip from sdcard > Choose zip from sdcard and find that SuperSU.zip file and click it and then click YEs. after installing your device is successfully rooted..

How To Root & Install CWM Recovery On HTC One Max


As the HTC One was a great flagship from HTC this time we have the phablet version of that, it is the HTC One Max, it have a great screen, great memory, Camera etc but now it is upgraded with finger print system. It have a black sensor ported behind the phone below the camera, now we will flash a custom recovery on this great phablet as well as get root access to this device.

Before You Begin:
1. You should have to unlock bootloader of the device. Visit here
2. You should have to set up drivers and ADB for this device.


Downloads:
1. HTC USB Drivers
2. ADB files.
3. CWM Recovery.img
4. SuperSU.zip

Installing CWM Recovery
1. Install the usb drivers. 
2. Extract the adb & fastboot zip file.
3. Move the cwm recovery img file to the fastboot folder.
4. After unlocking the bootloader of the device reboot your phone in fastboot mode.
5. Connect it to the PC via USB cable.
6. Hold Shift and Right Click on Fastboot folder and click Open Command Prompt Here.
7. Type the following code.
fastboot flash recovery recovery-clockwork-touch-6.0.4.5-t6xx.img
8. After entering the code press enter and you will see a message that it will show time of flashing. if Not then properly install the drivers.

Rooting The Device
1. After flashing the CWM recovery.
2. Download the SuperSU.zip file and donot extract it, just move it to the internal storage of device.
3. Reboot your phone into fastboot mode and press recovery.
4. In Recovery, Install zip from sdcard > Choose zip from sdcard and find that SuperSU.zip file and click it and then click YEs. after installing your device is successfully rooted..

Posted at 04:06 |  by John Peter

Wednesday, 30 October 2013


Well  I am active in making new articles now i created this rooting method for HTC Rezound which is a midranger in latest competetion flagships and you guyz will just taste the taste of Android operating system by Rooting this device and doing some customizations, along with flashing ROMs, so get concentrated.

Before You Begin:
1. This will void the warranty of your device. However, you can reinstate the warranty by unrooting your device if there’s any unrooting procedure available.
2. Download and install the Moborobo app to your computer as this will install the ADB drivers for your device.
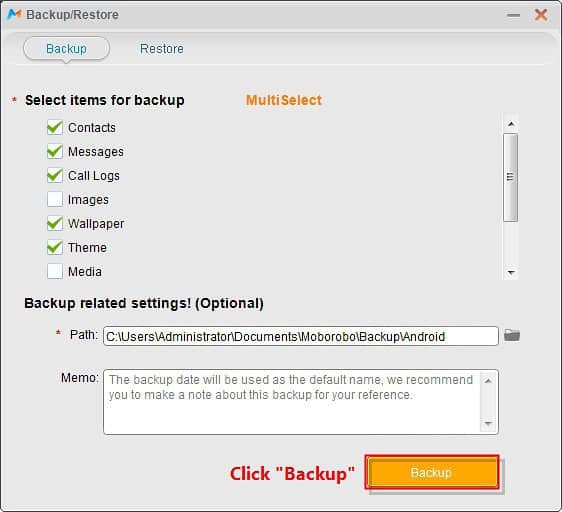
3. You can also use the Moborobo app to backup your device before proceeding and then use it to restore the device if something goes wrong (not a bad idea when dealing with root access). See below for all it can backup and restore.
Moborobo Backup
4. You must have unlocked bootloader of your device. You can visit the HTC website to unlock your bootloader.
Downloads:

Rooting Method:
1. Download and place the Toolkit folder onto your Desktop.
2. Extract files from the folder over to your Desktop.
3. Double-click on the Toolkit file and will open a new window.
4. Turn ON the USB debugging option on your device by heading to Menu > Settings > Developer options > USB debugging.
5. Plug in your device to your PC using the USB cable.
6. In the toolkit, click on CWM as shown below:
WinDroid Toolkit
Click on CWM button
7. It should flash the CWM Recovery on your device, shouldn’t take too long to finish.
8. Once the recovery’s been flashed, click on Gain Root button in the toolkit.
Gain Root Toolkit
Click on  Gain Root button
9. You’ll be taken to the CWM Recovery mode.
10. Once there, select install zip from sdcard followed by choose zip from sdcard.
11. Choose the Superuser.zip file to be flashed on your device.
12. It should begin flashing the file on your device and will be done within a minute or two.
Congratulations Your HTC Rezound smartphone has been successfully rooted. 

How To Root HTC Rezound


Well  I am active in making new articles now i created this rooting method for HTC Rezound which is a midranger in latest competetion flagships and you guyz will just taste the taste of Android operating system by Rooting this device and doing some customizations, along with flashing ROMs, so get concentrated.

Before You Begin:
1. This will void the warranty of your device. However, you can reinstate the warranty by unrooting your device if there’s any unrooting procedure available.
2. Download and install the Moborobo app to your computer as this will install the ADB drivers for your device.
3. You can also use the Moborobo app to backup your device before proceeding and then use it to restore the device if something goes wrong (not a bad idea when dealing with root access). See below for all it can backup and restore.
Moborobo Backup
4. You must have unlocked bootloader of your device. You can visit the HTC website to unlock your bootloader.
Downloads:

Rooting Method:
1. Download and place the Toolkit folder onto your Desktop.
2. Extract files from the folder over to your Desktop.
3. Double-click on the Toolkit file and will open a new window.
4. Turn ON the USB debugging option on your device by heading to Menu > Settings > Developer options > USB debugging.
5. Plug in your device to your PC using the USB cable.
6. In the toolkit, click on CWM as shown below:
WinDroid Toolkit
Click on CWM button
7. It should flash the CWM Recovery on your device, shouldn’t take too long to finish.
8. Once the recovery’s been flashed, click on Gain Root button in the toolkit.
Gain Root Toolkit
Click on  Gain Root button
9. You’ll be taken to the CWM Recovery mode.
10. Once there, select install zip from sdcard followed by choose zip from sdcard.
11. Choose the Superuser.zip file to be flashed on your device.
12. It should begin flashing the file on your device and will be done within a minute or two.
Congratulations Your HTC Rezound smartphone has been successfully rooted. 

Posted at 09:33 |  by John Peter

Friday, 4 October 2013

HTC One VX is also a high speced smartphone from HTC in the line of One, this is powered by a dual core processor, also supports 2G, 3G and 4G network, but the camera is mid range which is a 5 megapixel, i will teach you how to get root access this device, with having root access to this device you can install many rooted apps available in Play Store and also you can overclock it, you can do much and more customization.

I. Before You Begin:

1. This method will void the warranty of your HTC One VX
2. The following procedure works on Windows based PCs only.

II. Downloading Required Files:

III. Rooting the HTC One VX:

1. Place the Root Package archive on the Desktop of your PC.
2. Extract files from the archive to your Desktop. Don’t launch any files just yet.
3. Turn ON the USB debugging option on your device by heading to Menu>>Settings>>Developer options>>USB debugging.
4. Turn OFF the device.
5. Reboot the device into Fastboot mode. To do so, simply hold down the Volume DOWN+Power buttons together.
6. Once inside the Fastboot mode, connect the device to your PC using the USB cable.
7. Open a Command Prompt Window on your Desktop. To do that, hold down the Shift button on your keyboard and right-click on any empty area on the screen, then select Open command window here.
8. Type in following command into the Command Prompt Window:
fastboot flash boot boot.img
9. Once it’s done, issue the following command:
fastboot reboot
10. Your device will reboot. Once it boots up, enter the following command:
adb remount
11. Next, enter following commands into the Command Prompt Window one-by-one. Press ENTER after each line you type:
adb push Superuser.apk /system/app/
adb push su /system/xbin/
adb shell mkdir /system/bin/.ext
adb push .su /system/bin/.ext/
adb shell chmod 6755 /system/xbin/su
adb shell chmod 6755 /system/bin/.ext/.su
adb shell chmod 777 /system/bin/.ext
adb shell ln -s /system/xbin/su /system/bin/su
adb reboot
12. Your device will reboot in normal mode.
13. Once it boots up, simply open the Superuser app from your App Drawer.
14. Tap the Update binaries button in the app and let it do the rest of the work.
15. And you’re all done!
Brilliant! Your device has been successfully rooted and the SU binaries have also been updated. Now load-up some root-only apps on your device to realize the power of root-access!

How To Root HTC One VX

HTC One VX is also a high speced smartphone from HTC in the line of One, this is powered by a dual core processor, also supports 2G, 3G and 4G network, but the camera is mid range which is a 5 megapixel, i will teach you how to get root access this device, with having root access to this device you can install many rooted apps available in Play Store and also you can overclock it, you can do much and more customization.

I. Before You Begin:

1. This method will void the warranty of your HTC One VX
2. The following procedure works on Windows based PCs only.

II. Downloading Required Files:

III. Rooting the HTC One VX:

1. Place the Root Package archive on the Desktop of your PC.
2. Extract files from the archive to your Desktop. Don’t launch any files just yet.
3. Turn ON the USB debugging option on your device by heading to Menu>>Settings>>Developer options>>USB debugging.
4. Turn OFF the device.
5. Reboot the device into Fastboot mode. To do so, simply hold down the Volume DOWN+Power buttons together.
6. Once inside the Fastboot mode, connect the device to your PC using the USB cable.
7. Open a Command Prompt Window on your Desktop. To do that, hold down the Shift button on your keyboard and right-click on any empty area on the screen, then select Open command window here.
8. Type in following command into the Command Prompt Window:
fastboot flash boot boot.img
9. Once it’s done, issue the following command:
fastboot reboot
10. Your device will reboot. Once it boots up, enter the following command:
adb remount
11. Next, enter following commands into the Command Prompt Window one-by-one. Press ENTER after each line you type:
adb push Superuser.apk /system/app/
adb push su /system/xbin/
adb shell mkdir /system/bin/.ext
adb push .su /system/bin/.ext/
adb shell chmod 6755 /system/xbin/su
adb shell chmod 6755 /system/bin/.ext/.su
adb shell chmod 777 /system/bin/.ext
adb shell ln -s /system/xbin/su /system/bin/su
adb reboot
12. Your device will reboot in normal mode.
13. Once it boots up, simply open the Superuser app from your App Drawer.
14. Tap the Update binaries button in the app and let it do the rest of the work.
15. And you’re all done!
Brilliant! Your device has been successfully rooted and the SU binaries have also been updated. Now load-up some root-only apps on your device to realize the power of root-access!

Posted at 03:13 |  by John Peter

Thursday, 3 October 2013

While having the only root access on a smartphone doesn't make it change, but some how you can only install rooted apps also can do customizations on your rooted smartphone but if you want full size customizations like flashing custom ROMs so you need to install a custom recovery on your rooted phone so now we will install a custom recovery by the name of ClockWorkMod recovery on this HTC One V.

I. Before You Begin:

1. You should have rooted your device using the procedure given here.
2. Your device should have at least 60% of battery life left.

II. Downloading Required Files:

III. Installing ClockworkMod Recovery on the HTC One V:

1. Put both the downloaded files onto your Desktop.
2. Rename the Recovery Image you downloaded to recovery.img. It’ll make it easier to remember.
3. Extract files from the Fastboot archive to your Desktop.
4. Turn OFF your device using the Power button.
5. Now, while your device is turned OFF, press and hold the Volume DOWN+Power buttons together to reboot your device into the HBOOT mode.
6. Select the Fastboot option from the HBOOT menu.
7. Connect the device to your PC using the USB cable.
8. Open a Command Prompt Window on your Desktop. This can be done by pressing and holding the Shift key on your keyboard and right-clicking on any empty area on the screen, choose the Open command window here option.
9. Type in the following command into the Command Prompt Window:
fastboot flash recovery recovery.img
10. It should install the CWM Recovery on your device.
11. After the recovery is installed on your device, just reboot it by issuing the following command:
fastboot reboot
12. Your device should reboot.
Great! You now have ClockworkMod Recovery on your HTC One V with all of that great features you have been waiting for for a long time.

How To Install Custom Recovery On HTC One V

While having the only root access on a smartphone doesn't make it change, but some how you can only install rooted apps also can do customizations on your rooted smartphone but if you want full size customizations like flashing custom ROMs so you need to install a custom recovery on your rooted phone so now we will install a custom recovery by the name of ClockWorkMod recovery on this HTC One V.

I. Before You Begin:

1. You should have rooted your device using the procedure given here.
2. Your device should have at least 60% of battery life left.

II. Downloading Required Files:

III. Installing ClockworkMod Recovery on the HTC One V:

1. Put both the downloaded files onto your Desktop.
2. Rename the Recovery Image you downloaded to recovery.img. It’ll make it easier to remember.
3. Extract files from the Fastboot archive to your Desktop.
4. Turn OFF your device using the Power button.
5. Now, while your device is turned OFF, press and hold the Volume DOWN+Power buttons together to reboot your device into the HBOOT mode.
6. Select the Fastboot option from the HBOOT menu.
7. Connect the device to your PC using the USB cable.
8. Open a Command Prompt Window on your Desktop. This can be done by pressing and holding the Shift key on your keyboard and right-clicking on any empty area on the screen, choose the Open command window here option.
9. Type in the following command into the Command Prompt Window:
fastboot flash recovery recovery.img
10. It should install the CWM Recovery on your device.
11. After the recovery is installed on your device, just reboot it by issuing the following command:
fastboot reboot
12. Your device should reboot.
Great! You now have ClockworkMod Recovery on your HTC One V with all of that great features you have been waiting for for a long time.

Posted at 00:06 |  by John Peter

Wednesday, 2 October 2013

Well this is also a mid ranger from HTC by name of HTC One V and it is powered by a 1Ghz Qualcomm CPU also have Gig of RAM, a fair 5 Mega Pixel camera but from HTC these mid range phones are too much slower as compared to other mid rangers so get concentrated how to root this midrange phone from HTC and the method starts NOW!!!

I. Before You Begin:

  1. Once you have rooted your phone, its warranty will be voided. You shouldn’t worry about this because you can get back the warranty by either unrooting your phone or installing the stock firmware.
  2. Make sure your phone have at least 50% of battery life left. It is to avoid any interruptions during the process.

II. Downloading Required Files:

  1. You will need your HTC One V’s bootloader unlocked. You can do that here.
  2. Download the required Superboot Image from here.

III. Rooting HTC One V:

  1. Unzip files from the Superboot archive file and put them on your Desktop for easy access.
  2. Turn OFF your HTC One V smartphone.
  3. Boot up your phone into the bootloader mode. To do that, press and hold Volume DOWN key and then press the Power key.
  4. When you have entered the bootloader mode, connect your phone to your PC using the USB cable.
  5. a) If you are using a Windows PC, run the install-superboot-windows.bat file by double-clicking on it.
    b) If you are running Mac OS, then open a Terminal Window at the place where you have put extracted files, it should be Desktop. Type the following commands in the Terminal:
    chmod +x install-superboot-mac.sh
    ./install-superboot-mac.sh

    c) If you are having Linux as your OS, then open a Terminal where the extracted files exist and type in the following commands:
    chmod +x install-superboot-linux.sh
    ./install-superboot-linux.sh
  6. It will take a few seconds to root your phone. When it’s done, disconnect your phone from the PC.
That’s all. You are now running a rooted HTC One V smartphone that has the ability to run the special apps developed for the rooted phones.

How To Root HTC One V

Well this is also a mid ranger from HTC by name of HTC One V and it is powered by a 1Ghz Qualcomm CPU also have Gig of RAM, a fair 5 Mega Pixel camera but from HTC these mid range phones are too much slower as compared to other mid rangers so get concentrated how to root this midrange phone from HTC and the method starts NOW!!!

I. Before You Begin:

  1. Once you have rooted your phone, its warranty will be voided. You shouldn’t worry about this because you can get back the warranty by either unrooting your phone or installing the stock firmware.
  2. Make sure your phone have at least 50% of battery life left. It is to avoid any interruptions during the process.

II. Downloading Required Files:

  1. You will need your HTC One V’s bootloader unlocked. You can do that here.
  2. Download the required Superboot Image from here.

III. Rooting HTC One V:

  1. Unzip files from the Superboot archive file and put them on your Desktop for easy access.
  2. Turn OFF your HTC One V smartphone.
  3. Boot up your phone into the bootloader mode. To do that, press and hold Volume DOWN key and then press the Power key.
  4. When you have entered the bootloader mode, connect your phone to your PC using the USB cable.
  5. a) If you are using a Windows PC, run the install-superboot-windows.bat file by double-clicking on it.
    b) If you are running Mac OS, then open a Terminal Window at the place where you have put extracted files, it should be Desktop. Type the following commands in the Terminal:
    chmod +x install-superboot-mac.sh
    ./install-superboot-mac.sh

    c) If you are having Linux as your OS, then open a Terminal where the extracted files exist and type in the following commands:
    chmod +x install-superboot-linux.sh
    ./install-superboot-linux.sh
  6. It will take a few seconds to root your phone. When it’s done, disconnect your phone from the PC.
That’s all. You are now running a rooted HTC One V smartphone that has the ability to run the special apps developed for the rooted phones.

Posted at 23:46 |  by John Peter

Monday, 30 September 2013

Well the HTC One X is good smartphone as powered by Quad Core Processor, an 8 Mega Pixel camera, good battery as well as it has also gotten ROOT access but to flash custom ROMs you need to install custom Recovery so this is the article for HTC One X which will teach you how to install a custom recovery on this smartphone.

I. Before You Begin:

1. You must have a rooted HTC One X smartphone, learn how to root it from here.
2. There’re some functions in the recovery which seems to be not working.

II. Downloading Required Files:

1. Download ClockworkMod Touch Recovery Image from here.
2. Download Fastboot package from here.

III. Installing ClockworkMod Touch Recovery on HTC One X:

1. Extract files from the Fastboot archive to the Desktop of your PC. You will get four files from it.
2. On your HTC One X, enable USB debugging by going to Menu>>Settings>>Applications>>Development>>USB debugging and check-mark the box.
3. Turn OFF your smartphone using the Power button.
4. Press and hold Volume DOWN button and then immediately press Power button. Select Fastboot mode from the menu that appears on the screen.
5. Connect your phone to your PC using the USB cable that came with it.
6. Open a Command Prompt Window on your Desktop and then type in the following commands. It will flash recovery on your phone.
fastboot flash recovery recovery-clockwork-touch-5.8.3.1-endeavoru.img
7. When the flashing is done, simply enter the following command into Command Prompt Window to reboot your phone.
fastboot reboot
Your job is done. You have successfully installed ClockworkMod Touch Recovery on your HTC One X and from now on, you will be able to load custom ROMs on your phone.

How To Install Recovery On HTC One X

Well the HTC One X is good smartphone as powered by Quad Core Processor, an 8 Mega Pixel camera, good battery as well as it has also gotten ROOT access but to flash custom ROMs you need to install custom Recovery so this is the article for HTC One X which will teach you how to install a custom recovery on this smartphone.

I. Before You Begin:

1. You must have a rooted HTC One X smartphone, learn how to root it from here.
2. There’re some functions in the recovery which seems to be not working.

II. Downloading Required Files:

1. Download ClockworkMod Touch Recovery Image from here.
2. Download Fastboot package from here.

III. Installing ClockworkMod Touch Recovery on HTC One X:

1. Extract files from the Fastboot archive to the Desktop of your PC. You will get four files from it.
2. On your HTC One X, enable USB debugging by going to Menu>>Settings>>Applications>>Development>>USB debugging and check-mark the box.
3. Turn OFF your smartphone using the Power button.
4. Press and hold Volume DOWN button and then immediately press Power button. Select Fastboot mode from the menu that appears on the screen.
5. Connect your phone to your PC using the USB cable that came with it.
6. Open a Command Prompt Window on your Desktop and then type in the following commands. It will flash recovery on your phone.
fastboot flash recovery recovery-clockwork-touch-5.8.3.1-endeavoru.img
7. When the flashing is done, simply enter the following command into Command Prompt Window to reboot your phone.
fastboot reboot
Your job is done. You have successfully installed ClockworkMod Touch Recovery on your HTC One X and from now on, you will be able to load custom ROMs on your phone.

Posted at 00:11 |  by John Peter

Friday, 13 September 2013

Before You Begin: (must do)
1. How To Root HTC One S
2. How To Flash ClockworkMod Recovery On HTC One S

Downloads:
1. 4.3 PAC ROM
2. Google Apps

Installation:
1. Put your downloaded file in your phones internal storage
2. Reboot your One S in recovery mode
3. Wipe data/cache
4. Wipe dalvik cache
5. Install zip from sdcard > Choose zip from sdcard
6. Click on that ROM zip file and click yes
7. after installation of ROM install Google Apps as same as above method.
8. Reboot System Now

Enjiy Rom

[4.3 PAC ROM] HTC One S

Before You Begin: (must do)
1. How To Root HTC One S
2. How To Flash ClockworkMod Recovery On HTC One S

Downloads:
1. 4.3 PAC ROM
2. Google Apps

Installation:
1. Put your downloaded file in your phones internal storage
2. Reboot your One S in recovery mode
3. Wipe data/cache
4. Wipe dalvik cache
5. Install zip from sdcard > Choose zip from sdcard
6. Click on that ROM zip file and click yes
7. after installation of ROM install Google Apps as same as above method.
8. Reboot System Now

Enjiy Rom

Posted at 20:52 |  by John Peter
HTC One S is among the new Android smartphones which are launched recently. In one of our articles, we showed you how you can root your HTC One S and in this article, we are going to show you how you can install ClockworkMod Touch Recovery on your HTC One S smartphone. After installing the custom recovery, you will be able to load custom ROMs on your phone to enjoy better performance. You can do much more than that using the CWM recovery, read on to learn how to install it on your phone.

I. BEFORE YOU BEGIN:

1. This is an unofficial ClockworkMod Touch Recovery for HTC One S.
2. Your phone should have 50% of battery life left to go through the process without any interruptions.
3. You must have unlocked bootloader of your phone, do it from here.
4. You must have a rooted HTC One S smartphone, if you haven’t rooted it yet, head to our tutorial on how to root HTC One S.

II. DOWNLOADING REQUIRED FILES:

1. Download Unofficial ClockworkMod Touch Recovery from here.
2. Download Fastbook package file from here.

III. INSTALLING UNOFFICIAL CWM TOUCH RECOVERY ON HTC ONE S:

1. Once the download of Fastboot completes, extract files from it to the Desktop of your PC.
2. Place the CWM Touch Recovery Image file on the Desktop of your PC where you have put the fastboot files.
3. Turn OFF your HTC One S smartphone.
4. Boot it in bootloader mode. To do so, press and hold Volume DOWN key and then press the Power key.
5. From the menu of bootloader, select Fastboot using the Power key.
6. When the phone is in Bootloader mode, connect it to your PC using the USB cable that came with it.
7. Open a Command Prompt Window (for Windows) or a Terminal Window (for Linux) on the desktop, where the fastboot and recovery files exist.
8. Type in the following command in the Command Window. If it shows your device ID, then go ahead else disconnect and connect your phone again.
fastboot devices
9. Enter following command in the Command Window to install the recovery:
fastboot flash recovery r1-modaco-recovery-clockwork-touch-ville.img
10. When it is done installing the recovery, just reboot your phone by entering the following command in the same Command Window:
fastboot reboot

How To Install CWM Recovery On HTC One S

HTC One S is among the new Android smartphones which are launched recently. In one of our articles, we showed you how you can root your HTC One S and in this article, we are going to show you how you can install ClockworkMod Touch Recovery on your HTC One S smartphone. After installing the custom recovery, you will be able to load custom ROMs on your phone to enjoy better performance. You can do much more than that using the CWM recovery, read on to learn how to install it on your phone.

I. BEFORE YOU BEGIN:

1. This is an unofficial ClockworkMod Touch Recovery for HTC One S.
2. Your phone should have 50% of battery life left to go through the process without any interruptions.
3. You must have unlocked bootloader of your phone, do it from here.
4. You must have a rooted HTC One S smartphone, if you haven’t rooted it yet, head to our tutorial on how to root HTC One S.

II. DOWNLOADING REQUIRED FILES:

1. Download Unofficial ClockworkMod Touch Recovery from here.
2. Download Fastbook package file from here.

III. INSTALLING UNOFFICIAL CWM TOUCH RECOVERY ON HTC ONE S:

1. Once the download of Fastboot completes, extract files from it to the Desktop of your PC.
2. Place the CWM Touch Recovery Image file on the Desktop of your PC where you have put the fastboot files.
3. Turn OFF your HTC One S smartphone.
4. Boot it in bootloader mode. To do so, press and hold Volume DOWN key and then press the Power key.
5. From the menu of bootloader, select Fastboot using the Power key.
6. When the phone is in Bootloader mode, connect it to your PC using the USB cable that came with it.
7. Open a Command Prompt Window (for Windows) or a Terminal Window (for Linux) on the desktop, where the fastboot and recovery files exist.
8. Type in the following command in the Command Window. If it shows your device ID, then go ahead else disconnect and connect your phone again.
fastboot devices
9. Enter following command in the Command Window to install the recovery:
fastboot flash recovery r1-modaco-recovery-clockwork-touch-ville.img
10. When it is done installing the recovery, just reboot your phone by entering the following command in the same Command Window:
fastboot reboot

Posted at 20:36 |  by John Peter
Blogging World. Proudly Powered by Blogger.
back to top