All Stories

Sunday, 10 November 2013

"Learn How To Flash An Official Firmware For Samsung Devices"

Well guyz this is the complete tutorial/guide that "How an Official Samsung Firmware is Installed/Flashed on a Samsung smartphone/tablet" , the method is very easy to perform and I have made it more easy for the newbies who don't know what is flashing, Odin etc. Some time the phone software update is late or not available in the area so with this tutorial you can Install the latest Official Samsung released firmwares on your device.


1. Drivers Setup
Well for connecting any device to PC it is must to first install its drivers for the device than connect that. so for Samsung Devices you should install these both.


2. Odin
This is a software through which we can flash a custom .tar etc files. Now it is must to have this software on PC
a. Odin (second link if first didnt work) All versions all available in folder.


3. Flashing A Firmware
To flash an official firmware for Samsung Device. first you should put your phone in download mode. By pressing Volume Down + Power Button + Home Button at the same time for some time when the Warning! screen appears. then leave them and press Volume Up button so download mode starts. as shown in image.
                          [the first Warning!]                                        [After pressing Volume Up button]

When the second screen appears so connect your phone/tablet to PC. and then Open Odin tool. any version. as shown in image
[ this is a 3.4 version of odin you can try any one ]

When you connect your phone so there will be a message shown in message box i.e <ID:0/010> Added so it means that your phone is connected properly if Added not shown so try it again, then check on PDA check box and click PDA button and pick up that firmware file which is .tar/.md5 etc and wait if it was checking it. then click Start. the progress will be done and your phone will be restarted several times during flashing. after completion Pass message will be shown in above boxes. thats it.

Learn How To Flash Samsung Firmware

"Learn How To Flash An Official Firmware For Samsung Devices"

Well guyz this is the complete tutorial/guide that "How an Official Samsung Firmware is Installed/Flashed on a Samsung smartphone/tablet" , the method is very easy to perform and I have made it more easy for the newbies who don't know what is flashing, Odin etc. Some time the phone software update is late or not available in the area so with this tutorial you can Install the latest Official Samsung released firmwares on your device.


1. Drivers Setup
Well for connecting any device to PC it is must to first install its drivers for the device than connect that. so for Samsung Devices you should install these both.


2. Odin
This is a software through which we can flash a custom .tar etc files. Now it is must to have this software on PC
a. Odin (second link if first didnt work) All versions all available in folder.


3. Flashing A Firmware
To flash an official firmware for Samsung Device. first you should put your phone in download mode. By pressing Volume Down + Power Button + Home Button at the same time for some time when the Warning! screen appears. then leave them and press Volume Up button so download mode starts. as shown in image.
                          [the first Warning!]                                        [After pressing Volume Up button]

When the second screen appears so connect your phone/tablet to PC. and then Open Odin tool. any version. as shown in image
[ this is a 3.4 version of odin you can try any one ]

When you connect your phone so there will be a message shown in message box i.e <ID:0/010> Added so it means that your phone is connected properly if Added not shown so try it again, then check on PDA check box and click PDA button and pick up that firmware file which is .tar/.md5 etc and wait if it was checking it. then click Start. the progress will be done and your phone will be restarted several times during flashing. after completion Pass message will be shown in above boxes. thats it.

Posted at 09:37 |  by John Peter

Thursday, 7 November 2013

While having some good fun with a rooted flagship tastes something unique as compared to a mid range smartphone because a flasgship attracts the hackers and developers to give more support. This time we will grant root access to a latest flagship from Google which is Nexus 5, already the previous version Nexus 4 was pretty good and slick but this time we have to root this smart flagship. Now get concentrated

Before You Begin: (must do)
1. How to Unlock boot loader of Google Nexus 5
2. You should have to turned on USB Debugging, Installed drivers, ADB, Fastboot etc, visit here

Downloads:
1. CF-Auto Root

Installation:
1. Extract the downloaded zip file on your computer.
2. Turn off your Google Nexus 5.
3. Turn it on By pressing Volume Up + Volume Down + Power button at the same time for some seconds until a screen appears.
4. Plug your Nexus 5 to PC using USB cable. (when pc detects device so drivers are installed properly if not then reinstall drivers)
5. Open root-windows.bat file in that extracted folder and wait for some time. Your Device is now rooted.

Enjoy Rooting of Your Google Nexus 5.


How To Root Google Nexus 5

While having some good fun with a rooted flagship tastes something unique as compared to a mid range smartphone because a flasgship attracts the hackers and developers to give more support. This time we will grant root access to a latest flagship from Google which is Nexus 5, already the previous version Nexus 4 was pretty good and slick but this time we have to root this smart flagship. Now get concentrated

Before You Begin: (must do)
1. How to Unlock boot loader of Google Nexus 5
2. You should have to turned on USB Debugging, Installed drivers, ADB, Fastboot etc, visit here

Downloads:
1. CF-Auto Root

Installation:
1. Extract the downloaded zip file on your computer.
2. Turn off your Google Nexus 5.
3. Turn it on By pressing Volume Up + Volume Down + Power button at the same time for some seconds until a screen appears.
4. Plug your Nexus 5 to PC using USB cable. (when pc detects device so drivers are installed properly if not then reinstall drivers)
5. Open root-windows.bat file in that extracted folder and wait for some time. Your Device is now rooted.

Enjoy Rooting of Your Google Nexus 5.


Posted at 04:12 |  by John Peter

Before You Begin: (must do)
1. How to unlock the bootloader of  Google Nexus 5
2. How to Flash Recovery on Google Nexus 5

Downloads:
1. hammerhead_deodex_KRT16M.zip {this is ROM zip file}

Installation:
1. Put the downloaded zip file in your Google Nexus 5 internal storage.
2. Reboot your phone into recovery mode.
3. Wipe data/cache
4. Install > Choose the zip file where you puted before
5. After choosing swipe the below circle to confirm the installation.

Enjoy ROM

[4.4 KitKat ROM] Google Nexus 5


Before You Begin: (must do)
1. How to unlock the bootloader of  Google Nexus 5
2. How to Flash Recovery on Google Nexus 5

Downloads:
1. hammerhead_deodex_KRT16M.zip {this is ROM zip file}

Installation:
1. Put the downloaded zip file in your Google Nexus 5 internal storage.
2. Reboot your phone into recovery mode.
3. Wipe data/cache
4. Install > Choose the zip file where you puted before
5. After choosing swipe the below circle to confirm the installation.

Enjoy ROM

Posted at 03:48 |  by John Peter

Tuesday, 5 November 2013

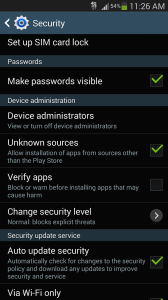
Well guyz this is a Samsung made phone but the UI is a little bit change why? because I have installed a 4.4 KitKat latest Launcher to look like the latest 4.4 Android, so guyz this article is way easy so just follow the steps and have a great launcher with any android device.

Before You Begin:
1. Make your device to install non-market apps by  taping on Settings > Security and tap ON Unknown Sources (currently this is Samsung Device so it is same as on other devices too)
Downloads:
1. PreBuild GMScore.apk
2. Velvet.apk
3. Google Home.apk

Installation:
1. Download all three apk package files and put it in your Android Device storage.
2. Tap on every apk file in the phone to install the APK files to phone.
3. When all the files are installed so when you Tap Home button so it will open a new window and choose the Google Home version and make it default.
Enjoy The Launcher

Google 4.4 KitKat Launcher Try It Must

Well guyz this is a Samsung made phone but the UI is a little bit change why? because I have installed a 4.4 KitKat latest Launcher to look like the latest 4.4 Android, so guyz this article is way easy so just follow the steps and have a great launcher with any android device.

Before You Begin:
1. Make your device to install non-market apps by  taping on Settings > Security and tap ON Unknown Sources (currently this is Samsung Device so it is same as on other devices too)
Downloads:
1. PreBuild GMScore.apk
2. Velvet.apk
3. Google Home.apk

Installation:
1. Download all three apk package files and put it in your Android Device storage.
2. Tap on every apk file in the phone to install the APK files to phone.
3. When all the files are installed so when you Tap Home button so it will open a new window and choose the Google Home version and make it default.
Enjoy The Launcher

Posted at 22:52 |  by John Peter
Hi guyz it take too much when I was creating article about unlocking this great device because the only problem creates the Bootloader so we have unlocked the boot loader of this phone so now we are free what to do, Now i have created this article for Flashing a Custom Recovery and through this we will be able to flash our favorite ROMs and other Zip flashable files, so just get concentrated to flash Recovery For Nexus 5.

Before You Begin: (must do)
1. You have to unlock your Nexus 5 Bootloader so you can do this, visit here to unlock bootloader.

Downloads:
1. TWRP Recovery
(other files are in the previous unlocking article)

Installation:
1. When you downloaded the Recovery img file so put this in the ADB & fastboot folder. where you downloaded it in previous unlocking article
2. Just same as plug your device into PC via USB cable.
3. When the device is connected so same as Hold Shift and right click on ADB and fastboot folder, and click Open Command Prompt Here, and type the following code: type the first line when device is restarted in bootloader mode so type the second.
adb reboot bootloader
fastboot flash recovery openrecovery-twrp-2.6.3.0-hammerhead.img

So this command line will first restart your device and then flash the recovery img file.

Going into Recovery Mode just few steps:
  1. Power off the phone.
  2. Press and hold Volume Down + Volume Up + Power buttons at the same time for a few seconds
  3. The device will enter Bootloader mode
  4. Use volume keys to navigate the menu and Power  button to select options/files.
  5. Now scroll till  ”Recovery mode” displays
  6. Then press Power button to select it
Now your device is flashed with a Custom TWRP recovery img. Enjoy ROMS

TWRP Recovery For Google Nexus 5

Hi guyz it take too much when I was creating article about unlocking this great device because the only problem creates the Bootloader so we have unlocked the boot loader of this phone so now we are free what to do, Now i have created this article for Flashing a Custom Recovery and through this we will be able to flash our favorite ROMs and other Zip flashable files, so just get concentrated to flash Recovery For Nexus 5.

Before You Begin: (must do)
1. You have to unlock your Nexus 5 Bootloader so you can do this, visit here to unlock bootloader.

Downloads:
1. TWRP Recovery
(other files are in the previous unlocking article)

Installation:
1. When you downloaded the Recovery img file so put this in the ADB & fastboot folder. where you downloaded it in previous unlocking article
2. Just same as plug your device into PC via USB cable.
3. When the device is connected so same as Hold Shift and right click on ADB and fastboot folder, and click Open Command Prompt Here, and type the following code: type the first line when device is restarted in bootloader mode so type the second.
adb reboot bootloader
fastboot flash recovery openrecovery-twrp-2.6.3.0-hammerhead.img

So this command line will first restart your device and then flash the recovery img file.

Going into Recovery Mode just few steps:
  1. Power off the phone.
  2. Press and hold Volume Down + Volume Up + Power buttons at the same time for a few seconds
  3. The device will enter Bootloader mode
  4. Use volume keys to navigate the menu and Power  button to select options/files.
  5. Now scroll till  ”Recovery mode” displays
  6. Then press Power button to select it
Now your device is flashed with a Custom TWRP recovery img. Enjoy ROMS

Posted at 22:09 |  by John Peter
We also had some fun with the previous version of Nexus the Nexus 4 and now we have the Nexus 5 with great design and the latest 4.4 Android KitKat but the UI is same as the 4.3 but there are some changes in UI and other smoothness, any way we will have to do some fun with Nexus 5 also, but the problem is here that it is arrived with a locked bootloader, so dont worry this article is only about the unlocking of boot loader of nexus 5. so it is easy but concentrate please.>>

Before You Begin:
1. Doing this method may void the Warranty of Nexus 5
2. You should know about ADB as we do in previous articles so we have to download ADB.
3. You have to also set up drivers for Nexus 5.

Downloads:
1. USB Drivers
2. ADB
*Extract both zip files, and update driver when device is pluged in to PC, from device manager then pick up the USB drivers folder where driver file is placed.


Installation:
1. Enable the “Developer options” by tapping 5 or 6 times on the Build number in Settings>About phone.
2. Tap back once and choose Developer options, Check on USB Debugging
3. Use USB cable to plug your Nexus 5 to PC (as shown in screen shots)
4. You’ll need to give it USB debugging access (don’t forget to check the box).
5.  Once you have given your computer debugging access, it’s time for commands. go to ADB folder where you extracted and Hold Shift then click Right mouse click and then click Open Command Prompt Here, so a command line window will appear. so type there:

     adb reboot bootloader

6. Wait for the device to reboot in bootloader mode. (as shown in image)
[ this is now bootloader mode]
7. Now go back to command prompt and again type the following command line:

                          fastboot oem unlock

8. A new page will appear for the confirmation of Unlock bootloader, click Volume Up and Tap Yes.. (as shown in image)
9. Your Phone data will be erased and the Boot loader will be unlocked. it can take some time.

Congratulations: Your phone is unlocked and now we will begin for Rooting, Flashing etc.

Unlock Bootloader Of Google Nexus 5

We also had some fun with the previous version of Nexus the Nexus 4 and now we have the Nexus 5 with great design and the latest 4.4 Android KitKat but the UI is same as the 4.3 but there are some changes in UI and other smoothness, any way we will have to do some fun with Nexus 5 also, but the problem is here that it is arrived with a locked bootloader, so dont worry this article is only about the unlocking of boot loader of nexus 5. so it is easy but concentrate please.>>

Before You Begin:
1. Doing this method may void the Warranty of Nexus 5
2. You should know about ADB as we do in previous articles so we have to download ADB.
3. You have to also set up drivers for Nexus 5.

Downloads:
1. USB Drivers
2. ADB
*Extract both zip files, and update driver when device is pluged in to PC, from device manager then pick up the USB drivers folder where driver file is placed.


Installation:
1. Enable the “Developer options” by tapping 5 or 6 times on the Build number in Settings>About phone.
2. Tap back once and choose Developer options, Check on USB Debugging
3. Use USB cable to plug your Nexus 5 to PC (as shown in screen shots)
4. You’ll need to give it USB debugging access (don’t forget to check the box).
5.  Once you have given your computer debugging access, it’s time for commands. go to ADB folder where you extracted and Hold Shift then click Right mouse click and then click Open Command Prompt Here, so a command line window will appear. so type there:

     adb reboot bootloader

6. Wait for the device to reboot in bootloader mode. (as shown in image)
[ this is now bootloader mode]
7. Now go back to command prompt and again type the following command line:

                          fastboot oem unlock

8. A new page will appear for the confirmation of Unlock bootloader, click Volume Up and Tap Yes.. (as shown in image)
9. Your Phone data will be erased and the Boot loader will be unlocked. it can take some time.

Congratulations: Your phone is unlocked and now we will begin for Rooting, Flashing etc.

Posted at 21:40 |  by John Peter

Samsung Galaxy S3 i9300 Official 4.3 Firmware 

Model: GT-I9300
Version: Android 4.3
Changelist: 1902166
Build date: Sat, 26 Oct 2013 03:29:22 +0000
Product Code: VDI
PDA: I9300XXUGMJ9
CSC: I9300VFGGMJ5
MODEM: I9300BUUGMJ3
(click here to download)


If you Want to learn Flashing A Samsung Firmware go to: Learn How To Flash Samsung Firmware on Samsung Devices

Samsung Galaxy S3 Official 4.3


Samsung Galaxy S3 i9300 Official 4.3 Firmware 

Model: GT-I9300
Version: Android 4.3
Changelist: 1902166
Build date: Sat, 26 Oct 2013 03:29:22 +0000
Product Code: VDI
PDA: I9300XXUGMJ9
CSC: I9300VFGGMJ5
MODEM: I9300BUUGMJ3
(click here to download)


If you Want to learn Flashing A Samsung Firmware go to: Learn How To Flash Samsung Firmware on Samsung Devices

Posted at 07:32 |  by John Peter
Blogging World. Proudly Powered by Blogger.
back to top