All Stories

Monday, 26 August 2013

The Galaxy Grand is an affordable dual-core Android smartphone available in India and comes in two variants, one with a single SIM slot (I9080) and the other with the option to slip in two SIMs (I9082).  The guide below will help you install ClockworkMod Recovery on the latter and later on, root it so you can make backups, overclock/underclock your device and many other features that are not available on unrooted devices.  If this is what you want, then read on to know how to install ClockworkMod Recovery on the Galaxy Grand.

I.  Before You Begin

1.  Back up everything you think is important before you begin.
2.  Charge your device to 75% or more before you start.
3.  Install the necessary drivers before you start the procedure.  This should prevent any errors popping up during the procedure and potentially bricking your device.
4.  Following this procedure will void your warranty; if you are not okay with this, do not read any further!

II.  Necessary Downloads

III.  Installing ClockworkMod Recovery on the Galaxy Grand

1.  Extract Odin3_v3.04.zip to a folder on your desktop.
2.  From the extracted folder, double-click on Odin3 v3.04.exe to run Odin.
3. Extract CWM-touch_i9082_chotu.tar.zip to a folder on your desktop.  You should end up with a file called CWM-touch_i9082_chotu.tar.md5 in the extracted folder.
4.  Click on the PDA button in Odin, navigate to the location of CWM-touch_i9082_chotu.tar.md5, select it, and then click on Open to load the file into Odin.
5.  Shut down your device and put it into Download mode.  To do this, press and hold Volume Down + Power + Home buttons simultaneously and release them when you see the GT-i9082 logo.  Now, press Volume Up to confirm entry into Download Mode.
6.  Connect your device to your PC.  Odin should now recognize the device and the ID:COM field should light up blue, signifying that Odin has detected your device without a problem.
7.  Make sure that only the Auto Reboot and F. Reset Time are checked under the Option section.
8.  Make sure that your Odin screen looks like the below screenshot and then click on Start.
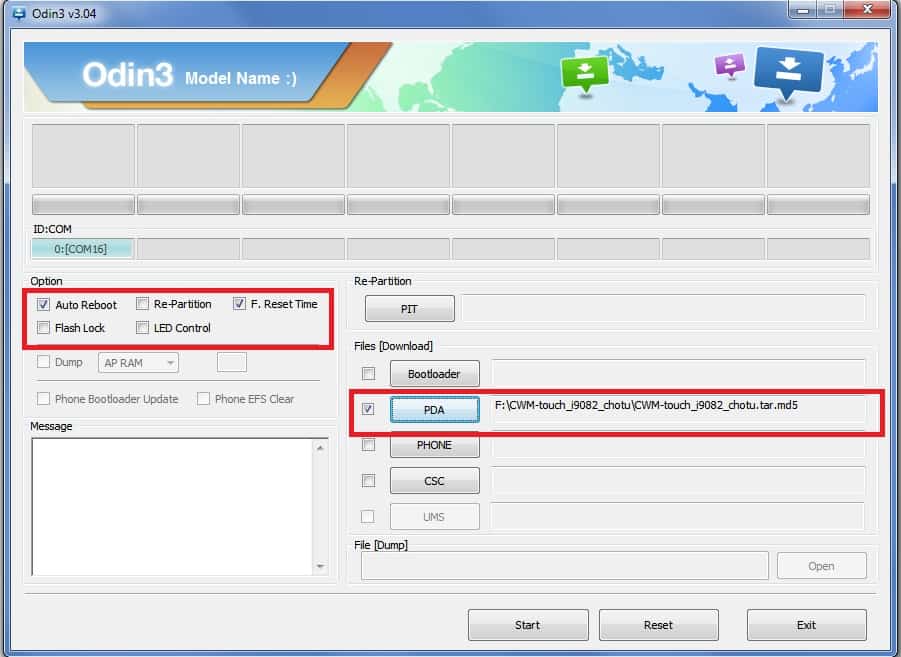
Galaxy-Grand-CWM
Once your device reboots, you should have ClockworkMod Recovery installed, which can be accessed by pressing Volume Up + Power + Home buttons when the device is off.

IV.  Root the Galaxy Grand

Head to our guide for help with rooting your Galaxy Grand.

How To Install CWM Recovery On Samsung Galaxy Grand Dous

The Galaxy Grand is an affordable dual-core Android smartphone available in India and comes in two variants, one with a single SIM slot (I9080) and the other with the option to slip in two SIMs (I9082).  The guide below will help you install ClockworkMod Recovery on the latter and later on, root it so you can make backups, overclock/underclock your device and many other features that are not available on unrooted devices.  If this is what you want, then read on to know how to install ClockworkMod Recovery on the Galaxy Grand.

I.  Before You Begin

1.  Back up everything you think is important before you begin.
2.  Charge your device to 75% or more before you start.
3.  Install the necessary drivers before you start the procedure.  This should prevent any errors popping up during the procedure and potentially bricking your device.
4.  Following this procedure will void your warranty; if you are not okay with this, do not read any further!

II.  Necessary Downloads

III.  Installing ClockworkMod Recovery on the Galaxy Grand

1.  Extract Odin3_v3.04.zip to a folder on your desktop.
2.  From the extracted folder, double-click on Odin3 v3.04.exe to run Odin.
3. Extract CWM-touch_i9082_chotu.tar.zip to a folder on your desktop.  You should end up with a file called CWM-touch_i9082_chotu.tar.md5 in the extracted folder.
4.  Click on the PDA button in Odin, navigate to the location of CWM-touch_i9082_chotu.tar.md5, select it, and then click on Open to load the file into Odin.
5.  Shut down your device and put it into Download mode.  To do this, press and hold Volume Down + Power + Home buttons simultaneously and release them when you see the GT-i9082 logo.  Now, press Volume Up to confirm entry into Download Mode.
6.  Connect your device to your PC.  Odin should now recognize the device and the ID:COM field should light up blue, signifying that Odin has detected your device without a problem.
7.  Make sure that only the Auto Reboot and F. Reset Time are checked under the Option section.
8.  Make sure that your Odin screen looks like the below screenshot and then click on Start.
Galaxy-Grand-CWM
Once your device reboots, you should have ClockworkMod Recovery installed, which can be accessed by pressing Volume Up + Power + Home buttons when the device is off.

IV.  Root the Galaxy Grand

Head to our guide for help with rooting your Galaxy Grand.

Posted at 02:57 |  by John Peter
Have a rooted Samsung Galaxy S Plus smartphone with a custom recovery installed on it? Want to get some little extra speeds out of your device? Great! This guide should help you do just that. Overclocking your device will improve the overall performance of your device and doing so is actually a child’s play, here’s how you can do that:

I. Before You Begin:

1. You must have rooted your device before doing this procedure. Check out our How to Root the Samsung Galaxy S Plus procedure to root your device.
2. You must have TWRP Recovery installed on your device. Follow our guide on the same to do that.

II. Make a Backup:

1. Head over to the Google Play and download and install the Quick Boot app on your device.
2. Once the app’s been installed, open it from your App Drawer.
3. Hit the Recovery option to reboot your device into Recovery mode.
4. Once inside Recovery, select backup and restore followed by backup.
5. It’ll create a backup of your entire filesystem and save it on your device.
6. You’re done!

III. Downloading Required Files:

IV. Flashing the Overclock Kernel on the Samsung Galaxy S Plus:

1. Place the broodKernel zip onto your Desktop.
2. Connect your device to your PC using the USB cable.
3. Copy the Kernel zip over to the root of your SD card.
4. Once it’s been copied, disconnect your device from your PC.
5. Launch the Quick Boot app from your App Drawer.
6. Hit the Recovery option and you should reboot into the Recovery mode.
7. Once in Recovery, select install zip from sdcard followed by choose zip from sdcard.
8. Choose the Kernel zip to be flashed on your device.
9. It will start flashing the kernel on your device, should take only a couple of minutes to finish.
10. Once the kernel has been flashed, reboot your device.
11. You’re done!

V. Overclocking the Samsung Galaxy S Plus:

1. Download and install any of these apps on your device:
2. Once installed, launch the app from your App Drawer.
3. Now increase your CPU clock speed using options available in the app. Keep on doing so as long as your device doesn’t crash.
4. Make sure not to choose save on boot option in the app.
5. Once your device becomes stable at a specific clock speed, close the app.
6. You’re all set!
Brilliant! Your device’s been overclocked and enjoy the blazing faster speeds of your device!

VI. Reverting Back to the Stock Kernel (Optional):

1. Launch the Quick Boot app from your App Drawer.
2. Tap the Recovery option to reboot into the Recovery mode.
3. Once in Recovery, select backup and restore followed by restore.
4. Choose the most recent backup you have there on the list to be restored on your device.
5. Once selected, it’ll begin restoring the backup.
6. Once the restoration’s done, reboot your device.
7. You’re all done!
Cool! You’ve just reverted back to the stock kernel! Not a bad decision if you weren’t really comfortable with overclocking!

How To OverClock Samsung Galaxy S Plus

Have a rooted Samsung Galaxy S Plus smartphone with a custom recovery installed on it? Want to get some little extra speeds out of your device? Great! This guide should help you do just that. Overclocking your device will improve the overall performance of your device and doing so is actually a child’s play, here’s how you can do that:

I. Before You Begin:

1. You must have rooted your device before doing this procedure. Check out our How to Root the Samsung Galaxy S Plus procedure to root your device.
2. You must have TWRP Recovery installed on your device. Follow our guide on the same to do that.

II. Make a Backup:

1. Head over to the Google Play and download and install the Quick Boot app on your device.
2. Once the app’s been installed, open it from your App Drawer.
3. Hit the Recovery option to reboot your device into Recovery mode.
4. Once inside Recovery, select backup and restore followed by backup.
5. It’ll create a backup of your entire filesystem and save it on your device.
6. You’re done!

III. Downloading Required Files:

IV. Flashing the Overclock Kernel on the Samsung Galaxy S Plus:

1. Place the broodKernel zip onto your Desktop.
2. Connect your device to your PC using the USB cable.
3. Copy the Kernel zip over to the root of your SD card.
4. Once it’s been copied, disconnect your device from your PC.
5. Launch the Quick Boot app from your App Drawer.
6. Hit the Recovery option and you should reboot into the Recovery mode.
7. Once in Recovery, select install zip from sdcard followed by choose zip from sdcard.
8. Choose the Kernel zip to be flashed on your device.
9. It will start flashing the kernel on your device, should take only a couple of minutes to finish.
10. Once the kernel has been flashed, reboot your device.
11. You’re done!

V. Overclocking the Samsung Galaxy S Plus:

1. Download and install any of these apps on your device:
2. Once installed, launch the app from your App Drawer.
3. Now increase your CPU clock speed using options available in the app. Keep on doing so as long as your device doesn’t crash.
4. Make sure not to choose save on boot option in the app.
5. Once your device becomes stable at a specific clock speed, close the app.
6. You’re all set!
Brilliant! Your device’s been overclocked and enjoy the blazing faster speeds of your device!

VI. Reverting Back to the Stock Kernel (Optional):

1. Launch the Quick Boot app from your App Drawer.
2. Tap the Recovery option to reboot into the Recovery mode.
3. Once in Recovery, select backup and restore followed by restore.
4. Choose the most recent backup you have there on the list to be restored on your device.
5. Once selected, it’ll begin restoring the backup.
6. Once the restoration’s done, reboot your device.
7. You’re all done!
Cool! You’ve just reverted back to the stock kernel! Not a bad decision if you weren’t really comfortable with overclocking!

Posted at 02:47 |  by John Peter
If you have been looking for a touch based recovery for your Galaxy S Plus I9001 smartphone, then TeamWin Recovery will be a perfect choice for you. TWRP recovery provides you almost all the features that you expect from a custom recovery, like it allows you to flash custom ROMs on your phone. You don’t have to use hardware buttons anymore, just tap on the option in the recovery and it will perform the appropriate action. Following is the guide on how you can install TWRP 2.1 Recovery on your Galaxy S Plus I91001 smartphone.

I. Before You Begin:

1. You must have rooted your Galaxy S Plus I9001 smartphone before doing this procedure. Please head to our how to Root Galaxy S Plus I9100 procedure first, finish it, then return to this procedure and continue.
2. This will replace your stock recovery. So, you will not be able to reboot your phone into the stock recovery afterwards.

II. Downloading Required Files:

1. Download the QuickFlasher Tool from here.
2. Download the TWRP 2.1 Touch Recovery Image from here.

III. Installing TWRP 2.1 Touch Recovery on Galaxy S Plus I9001:

1. Place the QuickFlasher and Recovery Image onto your Desktop.
2. Extract files from the QuickFlasher archive and place them on your Desktop.
3. Enable USB debugging on your phone by heading to Menu>>Settings>>Applications>>Development>>USB debugging.
4. Connect your phone to your PC with the help of the USB cable that came with it.
5. Launch the QuickFlasher Tool by double-clicking on sgsflasher_x86.exe file.
6. In the QuickFlasher Tool, check-mark the box labeled as Flash a new Recovery as shown in the below screenshot.
[ Quick Flasher Tool ]
7. Click on the Browse… button and locate the Recovery Image you downloaded earlier.
8. Hit the Start Now button to begin flashing the recovery on your phone.
9. After the recovery is successfully installed on your phone, your phone will reboot.
You did it ! You have successfully installed the Touch Based TWRP 2.1 Recovery on your Galaxy S Plus I9001 smartphone. Now, Go and get some custom ROMs to try out on your phone.

How To Install TWRP Recovery On Samsung Galaxy S Plus

If you have been looking for a touch based recovery for your Galaxy S Plus I9001 smartphone, then TeamWin Recovery will be a perfect choice for you. TWRP recovery provides you almost all the features that you expect from a custom recovery, like it allows you to flash custom ROMs on your phone. You don’t have to use hardware buttons anymore, just tap on the option in the recovery and it will perform the appropriate action. Following is the guide on how you can install TWRP 2.1 Recovery on your Galaxy S Plus I91001 smartphone.

I. Before You Begin:

1. You must have rooted your Galaxy S Plus I9001 smartphone before doing this procedure. Please head to our how to Root Galaxy S Plus I9100 procedure first, finish it, then return to this procedure and continue.
2. This will replace your stock recovery. So, you will not be able to reboot your phone into the stock recovery afterwards.

II. Downloading Required Files:

1. Download the QuickFlasher Tool from here.
2. Download the TWRP 2.1 Touch Recovery Image from here.

III. Installing TWRP 2.1 Touch Recovery on Galaxy S Plus I9001:

1. Place the QuickFlasher and Recovery Image onto your Desktop.
2. Extract files from the QuickFlasher archive and place them on your Desktop.
3. Enable USB debugging on your phone by heading to Menu>>Settings>>Applications>>Development>>USB debugging.
4. Connect your phone to your PC with the help of the USB cable that came with it.
5. Launch the QuickFlasher Tool by double-clicking on sgsflasher_x86.exe file.
6. In the QuickFlasher Tool, check-mark the box labeled as Flash a new Recovery as shown in the below screenshot.
[ Quick Flasher Tool ]
7. Click on the Browse… button and locate the Recovery Image you downloaded earlier.
8. Hit the Start Now button to begin flashing the recovery on your phone.
9. After the recovery is successfully installed on your phone, your phone will reboot.
You did it ! You have successfully installed the Touch Based TWRP 2.1 Recovery on your Galaxy S Plus I9001 smartphone. Now, Go and get some custom ROMs to try out on your phone.

Posted at 00:41 |  by John Peter

Sunday, 25 August 2013

Samsung Galaxy S Plus i9100 has been a successful smartphone and if you are a fortunate owner of this phone, then you should consider rooting it to expand its functionality. Here’s a simple guide explaining how you can root your Samsung Galaxy S Plus i9100 smartphone.

I. Before You Begin:

1. The warranty of the phone will be voided once you root it. If you need it in future, then you can apply the stock firmware or unroot your phone.
2. Make sure your phone has enough battery life left so it can last through the rooting process.

II. Downloading Required Files:

1. Download the Rooting Package from here.

III. Rooting Galaxy S Plus i9100:

1. Place the downloaded Rooting Package file onto your Desktop.
2. Connect your phone to your PC using the USB cable.
3. Transfer the Rooting Package file to your phone’s SD card storage. Do NOT put it inside any folder, just leave it in the root folder.
4. After the file transfer is completed, just disconnect your phone from the PC.
5. Turn OFF your smartphone using the Power key.
6. Boot your phone into the recovery mode. You can do it by pressing and holding Volume UP+Power keys together.
7. When you see a box icon on your phone’s screen, immediately press the Menu key and you will enter the recovery mode.
8. From the options which appear in recovery menu, choose apply update from sdcard option.
9. Select the file you transferred earlier to your phone using the Home key. The rooting process will begin and take a few seconds to finish.
10. Once the rooting process is finished, choose reboot system now from the recovery menu.
Your phone will reboot and when it boots up, you will see that you have root access on it.
IV. Custom Recovery:
How To Install TWRP Recovery On Samsung Galaxy S Plus

How To Root Samsung Galaxy S Plus

Samsung Galaxy S Plus i9100 has been a successful smartphone and if you are a fortunate owner of this phone, then you should consider rooting it to expand its functionality. Here’s a simple guide explaining how you can root your Samsung Galaxy S Plus i9100 smartphone.

I. Before You Begin:

1. The warranty of the phone will be voided once you root it. If you need it in future, then you can apply the stock firmware or unroot your phone.
2. Make sure your phone has enough battery life left so it can last through the rooting process.

II. Downloading Required Files:

1. Download the Rooting Package from here.

III. Rooting Galaxy S Plus i9100:

1. Place the downloaded Rooting Package file onto your Desktop.
2. Connect your phone to your PC using the USB cable.
3. Transfer the Rooting Package file to your phone’s SD card storage. Do NOT put it inside any folder, just leave it in the root folder.
4. After the file transfer is completed, just disconnect your phone from the PC.
5. Turn OFF your smartphone using the Power key.
6. Boot your phone into the recovery mode. You can do it by pressing and holding Volume UP+Power keys together.
7. When you see a box icon on your phone’s screen, immediately press the Menu key and you will enter the recovery mode.
8. From the options which appear in recovery menu, choose apply update from sdcard option.
9. Select the file you transferred earlier to your phone using the Home key. The rooting process will begin and take a few seconds to finish.
10. Once the rooting process is finished, choose reboot system now from the recovery menu.
Your phone will reboot and when it boots up, you will see that you have root access on it.
IV. Custom Recovery:
How To Install TWRP Recovery On Samsung Galaxy S Plus

Posted at 23:05 |  by John Peter
Have you been facing WiFi issues on your Galaxy Player 4.2 after flashing a custom recovery? No worries, here’s the solution for the issue. Just after flashing a custom recovery on the device, some users started reporting that they’re having issues with WiFi on their device and to address this, the developer came forth and gave us a flashable zip that once flashed, solves any of the issues caused by the recovery. Here’s how you can flash that fix on your device:

I. Before You Begin:

1. You must have rooted your device before doing this procedure. Our guide on the same will help you do that.
2. You must have ClockworkMod Recovery installed on your device. See our guide on the same over here.

II. Downloading Required Files:

III. Fixing WiFi Issue on the Samsung Galaxy Player 4.2:

1. Place the WiFi Fix Mod on your Desktop.
2. Plug in your device to your PC via USB cable.
3. Copy the Mod file over to the root of your SD card.
4. Once it’s been copied, unplug your device from your PC.
5. Now head on over to Google Play and download and install the Quick Boot app on your device.
6. Once it’s been installed, launch it from your App Drawer.
7. Hit Recovery option in the app and your device will reboot in Recovery mode.
8. From the Recovery menu, select install zip from sdcard followed by choose zip from sdcard.
9. Choose the WiFi Fix zip to be flashed on your device.
10. It’ll flash the file on your device, should take a minute or two to finish.
11. Once the flashing’s done, reboot your device.
12. And you’re all done!
Brilliant! The fix has been successfully applied on your device and you won’t have any issues with your WiFi any longer!

How To Fix WiFi Issue On Samsung Galaxy Player

Have you been facing WiFi issues on your Galaxy Player 4.2 after flashing a custom recovery? No worries, here’s the solution for the issue. Just after flashing a custom recovery on the device, some users started reporting that they’re having issues with WiFi on their device and to address this, the developer came forth and gave us a flashable zip that once flashed, solves any of the issues caused by the recovery. Here’s how you can flash that fix on your device:

I. Before You Begin:

1. You must have rooted your device before doing this procedure. Our guide on the same will help you do that.
2. You must have ClockworkMod Recovery installed on your device. See our guide on the same over here.

II. Downloading Required Files:

III. Fixing WiFi Issue on the Samsung Galaxy Player 4.2:

1. Place the WiFi Fix Mod on your Desktop.
2. Plug in your device to your PC via USB cable.
3. Copy the Mod file over to the root of your SD card.
4. Once it’s been copied, unplug your device from your PC.
5. Now head on over to Google Play and download and install the Quick Boot app on your device.
6. Once it’s been installed, launch it from your App Drawer.
7. Hit Recovery option in the app and your device will reboot in Recovery mode.
8. From the Recovery menu, select install zip from sdcard followed by choose zip from sdcard.
9. Choose the WiFi Fix zip to be flashed on your device.
10. It’ll flash the file on your device, should take a minute or two to finish.
11. Once the flashing’s done, reboot your device.
12. And you’re all done!
Brilliant! The fix has been successfully applied on your device and you won’t have any issues with your WiFi any longer!

Posted at 20:02 |  by John Peter
Wish you could install your favorite custom ROMs on your Samsung Galaxy Player 4.2? Well, it’s possible now, all thanks to the developers. A custom recovery has been developed for the said device and once you flash it on your device, you’ll be able to flash ROMs, Mods, Tweaks and almost all kind of flashable content. Here’s how you can get it on your device:

I. Before You Begin:

1. You must have rooted your device before doing this procedure. Please head to our How to Root the Samsung Galaxy Player 4.2 procedure first, finish it, then return to this procedure and continue.
2. This should flash ClockworkMod Recovery on your device.
3. Make sure your device has at least 60% of battery life left.

II. Downloading Required Files:

2. Odin

III. Flashing a Custom Recovery on the Samsung Galaxy Player 4.2:

1. Place both the files you downloaded to your Desktop.
2. Extract files from Odin archive over to your Desktop.
3. Double-click on the Odin executable file and it’ll launch.
4. Click on PDA and select the Stock Kernel file available on your Desktop.
5. Make sure that the Repartition box isn’t checked in the tool.
6. Turn OFF your device.
7. Turn it back on by holding down Volume DOWN+Home+Power buttons together.
8. Press the Volume UP button and you should be in Download mode.
9. Plug in your device to your PC using the USB cable.
10. Hit Start in the Odin and it’ll begin flashing the recovery.
11. Once the recovery’s been flashed, reboot your device.
12. You’re all set!
Congrats! You’ve successfully flashed a custom recovery on your Galaxy Player 4.2.

How To Flash A Custom Recovery On Samsung Galaxy Player 4.2

Wish you could install your favorite custom ROMs on your Samsung Galaxy Player 4.2? Well, it’s possible now, all thanks to the developers. A custom recovery has been developed for the said device and once you flash it on your device, you’ll be able to flash ROMs, Mods, Tweaks and almost all kind of flashable content. Here’s how you can get it on your device:

I. Before You Begin:

1. You must have rooted your device before doing this procedure. Please head to our How to Root the Samsung Galaxy Player 4.2 procedure first, finish it, then return to this procedure and continue.
2. This should flash ClockworkMod Recovery on your device.
3. Make sure your device has at least 60% of battery life left.

II. Downloading Required Files:

2. Odin

III. Flashing a Custom Recovery on the Samsung Galaxy Player 4.2:

1. Place both the files you downloaded to your Desktop.
2. Extract files from Odin archive over to your Desktop.
3. Double-click on the Odin executable file and it’ll launch.
4. Click on PDA and select the Stock Kernel file available on your Desktop.
5. Make sure that the Repartition box isn’t checked in the tool.
6. Turn OFF your device.
7. Turn it back on by holding down Volume DOWN+Home+Power buttons together.
8. Press the Volume UP button and you should be in Download mode.
9. Plug in your device to your PC using the USB cable.
10. Hit Start in the Odin and it’ll begin flashing the recovery.
11. Once the recovery’s been flashed, reboot your device.
12. You’re all set!
Congrats! You’ve successfully flashed a custom recovery on your Galaxy Player 4.2.

Posted at 19:38 |  by John Peter
Samsung Galaxy Player 4.2 users have been waiting for a root method since a long time and it looks like their wish is going to be fulfilled. A root method is now available for the aforementioned device that lets you gain root on the device and enjoy plenty of root-only apps available out there. Here’s how you can do that:

I. Before You Begin:

1. This will void the warranty of your device. However, you can reinstate the warranty by unrooting your device if there’s any unrooting procedure available.
2. This procedure works on Windows based PCs only.

II. Downloading Required Files:

1. Odin 

III. Rooting the Samsung Galaxy Player 4.2:

1. Place both the files you downloaded to your Desktop.
2. Extract files from both the archives over to your Desktop.
3. Double-click on the Odin executable file and it’ll open.
4. Click on PDA and select the Stock Rooted ROM file available on your Desktop.
5. Make sure that the Repartition box isn’t checked.
6. Turn OFF your device.
7. Turn it back on by holding down Volume DOWN+Home+Power buttons together.
8. Press the Volume UP button to get into Download mode.
9. Plug in your device to your PC via USB cable.
10. Hit Start in Odin and it’ll start flashing the firmware on your device.
11. Once the firmware has been flashed, reboot your device.
12. And you’re all done!
Excellent! You’ve successfully rooted your Samsung Galaxy Player 4.2 smartphone and it’s now ready to be loaded with root-only apps!

IV. Flash a Custom Recovery Image (Optional):

1. If you would like to flash a custom recovery image in order to flash custom ROMs, head to the How To Flash a Custom Recovery Image on the Samsung Galaxy Player 4.2 to learn how to do that.

How To Root Samsung Galaxy Player 4.2

Samsung Galaxy Player 4.2 users have been waiting for a root method since a long time and it looks like their wish is going to be fulfilled. A root method is now available for the aforementioned device that lets you gain root on the device and enjoy plenty of root-only apps available out there. Here’s how you can do that:

I. Before You Begin:

1. This will void the warranty of your device. However, you can reinstate the warranty by unrooting your device if there’s any unrooting procedure available.
2. This procedure works on Windows based PCs only.

II. Downloading Required Files:

1. Odin 

III. Rooting the Samsung Galaxy Player 4.2:

1. Place both the files you downloaded to your Desktop.
2. Extract files from both the archives over to your Desktop.
3. Double-click on the Odin executable file and it’ll open.
4. Click on PDA and select the Stock Rooted ROM file available on your Desktop.
5. Make sure that the Repartition box isn’t checked.
6. Turn OFF your device.
7. Turn it back on by holding down Volume DOWN+Home+Power buttons together.
8. Press the Volume UP button to get into Download mode.
9. Plug in your device to your PC via USB cable.
10. Hit Start in Odin and it’ll start flashing the firmware on your device.
11. Once the firmware has been flashed, reboot your device.
12. And you’re all done!
Excellent! You’ve successfully rooted your Samsung Galaxy Player 4.2 smartphone and it’s now ready to be loaded with root-only apps!

IV. Flash a Custom Recovery Image (Optional):

1. If you would like to flash a custom recovery image in order to flash custom ROMs, head to the How To Flash a Custom Recovery Image on the Samsung Galaxy Player 4.2 to learn how to do that.

Posted at 19:33 |  by John Peter
Blogging World. Proudly Powered by Blogger.
back to top